WebUI 반 실사 스타일로 그림 그리는 방법
WebUI를 사용해서 실제같은 그림을 생성해 보려고 하는데 아무것도 없는 상태에서 돌리면 맨 위의 이미지처럼 그림도 영 그런데다 사람들이 원하는 AI 그림이 위 이미지처럼 개성 있고 실제 사람
flatsun.tistory.com
이전 글에서 반 실사 스타일로
AI 그림 생성하는 방법을 진행해 봤는데
인터넷에서 보던 것 보다 퀄리티가 낮았기 때문에
이번 글에서는 높은 퀄리티로 뽑을 수 있도록 진행해보자
이 글로 처음 들어오는 사람들도 있을 것이기 때문에
이전에 했던 내용들도 중복으로 설명한다
따라서 저번 글에서 한 내용이면 생략하고 넘어가도 된다
먼저 실행하고 있는 WebUI를 종료한 후
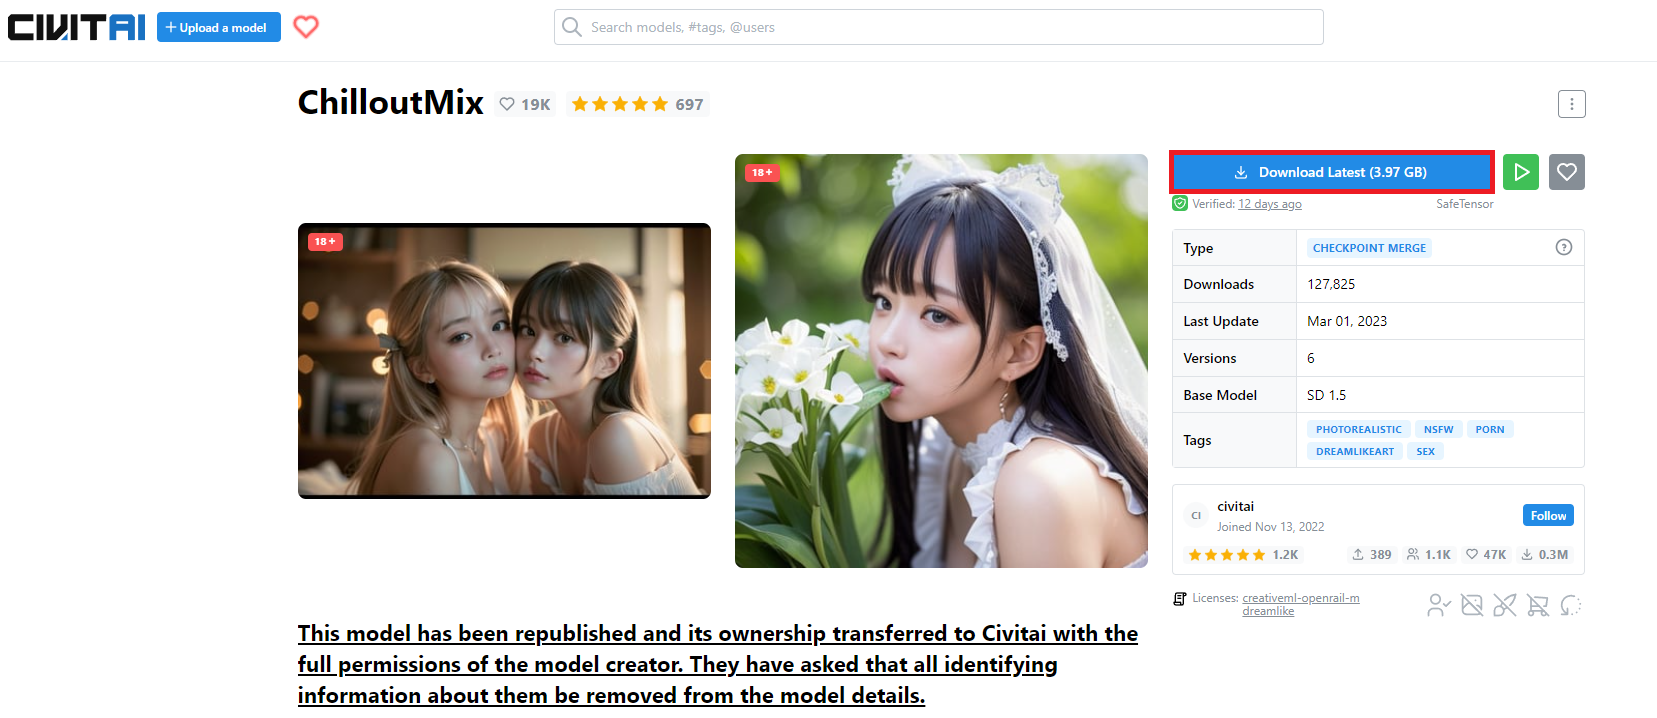
ChilloutMix | Stable Diffusion Checkpoint | Civitai
This model has been republished and its ownership transferred to Civitai with the full permissions of the model creator. They have asked that all identifying information about them be removed from the model details.*I modified the License.(22/2/Feb)That is
civitai.com
상단 링크로 이동해서
이미지를 참고해 Download Latest를 눌러
다운로드 받은 파일을 아래의 경로 안에 넣어준 후
D:\stable-diffusion-webui\models\Stable-diffusion
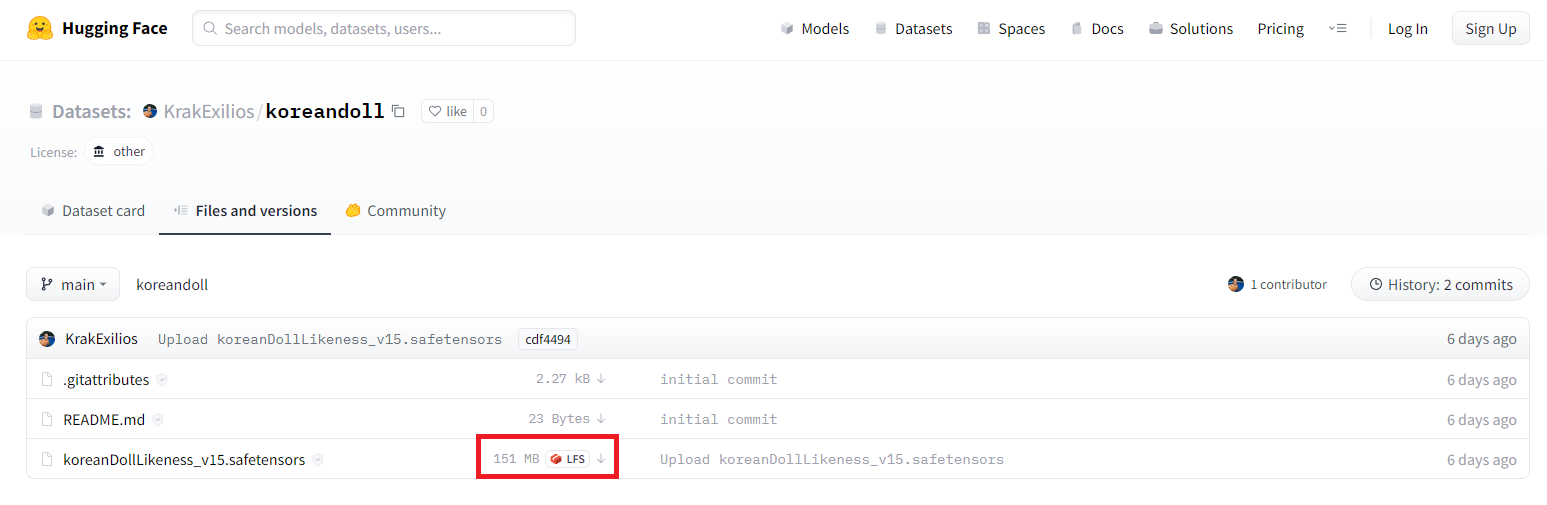
KrakExilios/koreandoll at main
huggingface.co
먼저 위 링크로 이동한 뒤
koreanDollLikeness 파일을 다운로드 받아서
아래 경로 안에 넣어주자
(이미 다운로드 했으면 또 안해도 됨!)
D:\stable-diffusion-webui\models\Lora
위 링크의 Lora는
얼굴을 만드는데 사용한다고 보면 된다
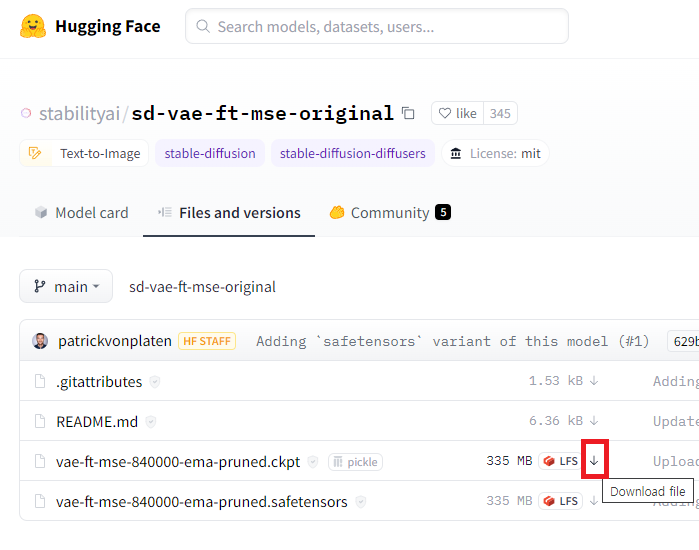
stabilityai/sd-vae-ft-mse-original at main
Detected Pickle imports (4) "torch._utils._rebuild_tensor_v2", "torch.IntStorage", "torch.FloatStorage", "collections.OrderedDict" What is a pickle import?
huggingface.co
다음은 위 링크로 이동해서
vae-ft-mse-840000-ema-pruned.ckpt를 받아주자
(역시 이전에 받았으면 생략)
다운로드 받은 후에는
D:\stable-diffusion-webui\models\VAE
경로에 넣어주면 된다
해당 파일은 이미지가 생성된 후
보정 처리를 담당하게 된다

https://civitai.com/models/4629/deep-negative-v1x
마지막으로 위 링크로 이동해서
Donwload를 눌러 Deep Negative를 받아준 뒤
ng_deepnegative_~.pt
파일을 아래 경로에 넣어주자
D:\stable-diffusion-webui\embeddings
이 파일은 불필요한 팔다리,
손가락이 생기는 것을 어느 정도 막아준다
이제 모두 다 설치하고 배치가 완료되었으면
WebUI를 다시 실행한 뒤
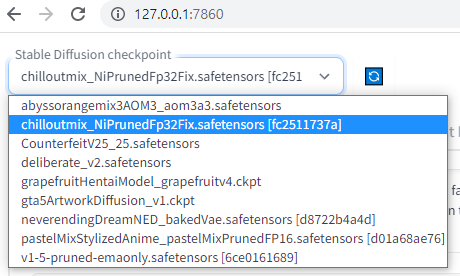
Stable Diffusion checkpoint 에서
chilloutmix 로 변경해 준 뒤
콤보박스가 비어버리면 2분 정도 기다려주면 된다

이후 Settings 메뉴에서
왼쪽 Stable Diffusion을 선택한 뒤
SD VAE에서 vae-ft-mse-840000-ema-pruned.ckpt를 고르고
위에 보이는 노란색 Apply settings를 눌러 적용해 주자

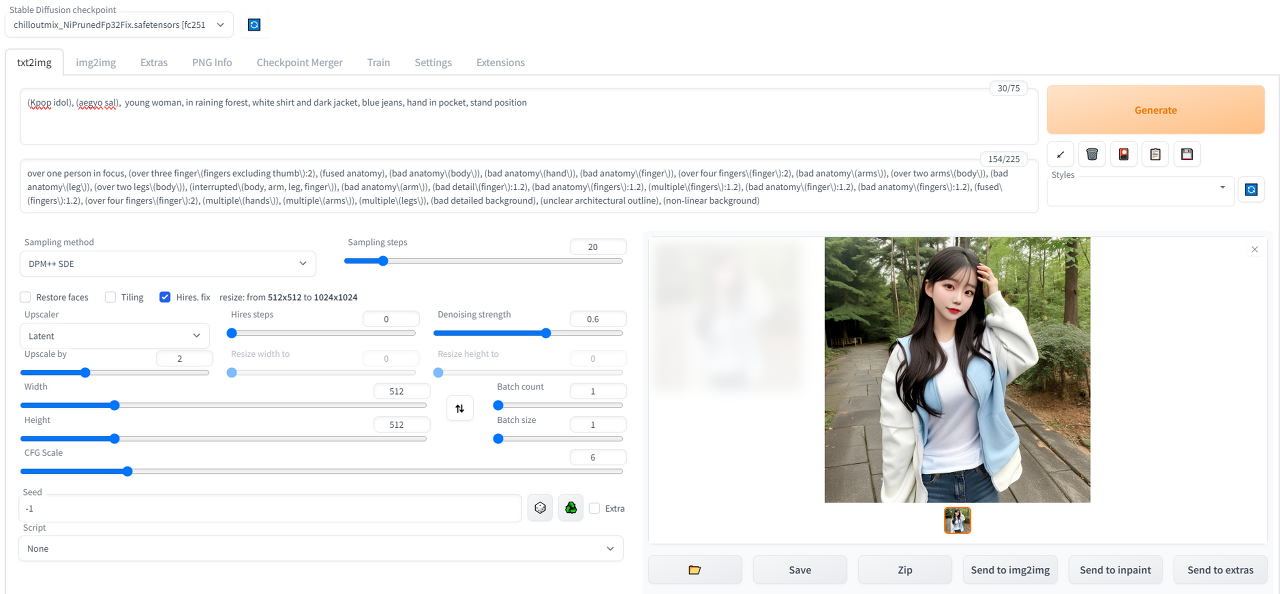
이제 txt2img 메뉴로 넘어와서
설정을 다음과 같이 맞춰주고
이제 최상단 Prompt를 입력해 보자
Positive Prompt
<lora:koreanDollLikeness_v15:0.4>, 8k, raw photo, (masterpiece), (best quality), highres, (realistic, photo-realistic:1.4),ultra detailed, physically-based rendering, detailed beautiful eyes and detailed face
Negative Prompt
ng_deepnegative_v1_75t, paintings, sketches, (worst quality:2), (low quality:2), (normal quality:2), lowres, normal quality, ((monochrome)), ((grayscale)), skin spots, acnes, skin blemishes, age spot, ((wrong feet)),(wrong shoes), bad feet, distorted, blurry, bad hands, missing fingers, multiple feet, bad knees, extra fingers
위 Positive, Negative Prompt가
모델 만들기 전에 최소한으로
들어가는 내용이라고 생각하면 된다
이후에는 필요한 내용들을 채워주면 되는데
유의할 점은 모델 외모는
koreanDollLikeness 를 사용했기 때문에
추후에 외모를 변경하고자 한다면
위에 강조표시한 부분만 변경해주면 된다
다음으로 Negative prompt는
크게 변경할 일이 없겠지만
ng_deepnegative_v1_75t는
아까 Deep Negative를 받았어야 지원이 되기 때문에
사용 전 꼭 확인해보고
<lora:koreanDollLikeness_v15:0.4>, 8k, raw photo, (masterpiece), (best quality), highres, (realistic, photo-realistic:1.4),ultra detailed, physically-based rendering, detailed beautiful eyes and detailed face, 1girl, upper body, long wavy hair, white shirt, black jacket, scrunchie on the arm, tennis skirt, stipe knee-high socks, black sneakers, in park
마지막으로 예제가 없다면
여자와 옷, 배경 정도를 추가해 놨는데
이걸 Positive Prompt에 복사 붙여넣기 한 뒤
Generate를 돌려보면


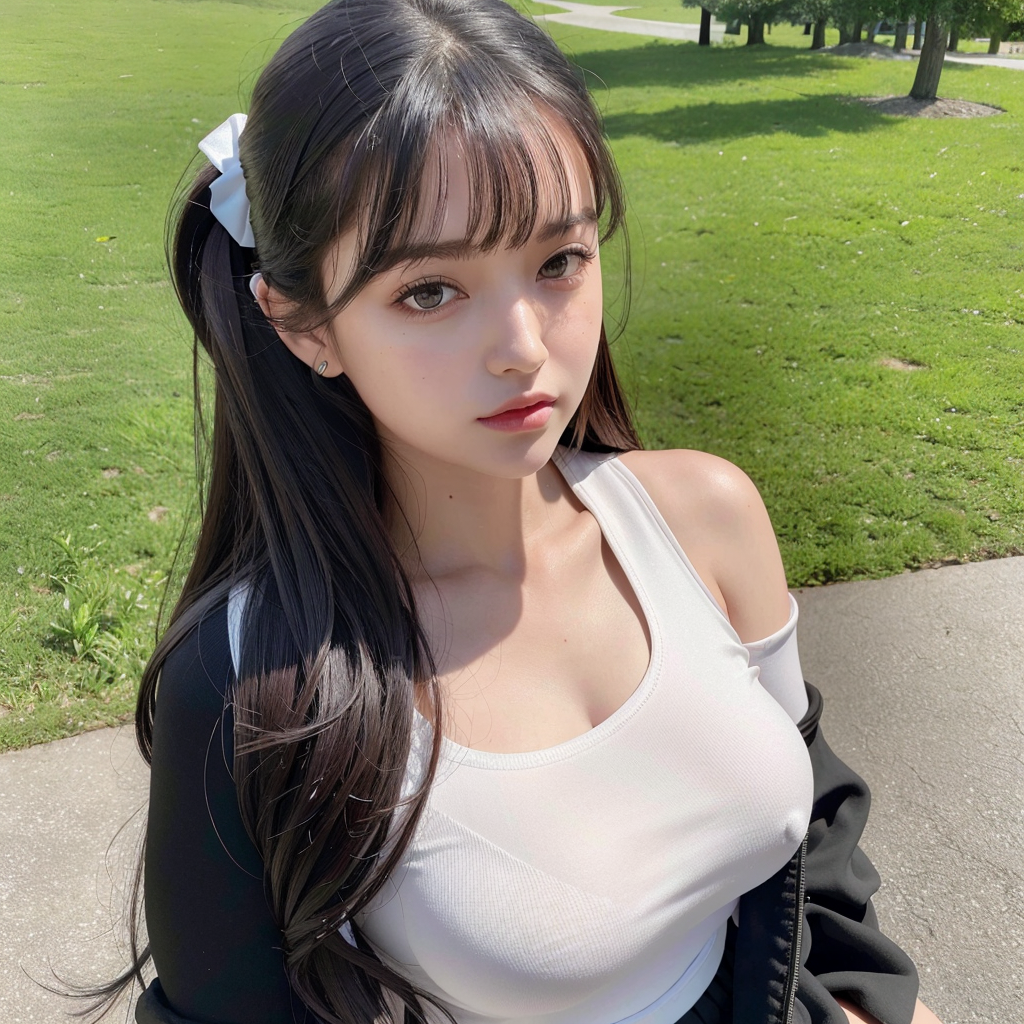
이제 어디 내놓을만 하게
이미지가 뽑혀져 나오는 것이 보인다
이후로 이것 저것 만져가며 이미지 생성해 보려면
아래 링크를 참고해주면 되겠다
WebUI txt2img(텍스트로 그림 그리기) 사용방법 정리
WebUI 에서 대부분의 그림을 사용하는 txt2img의 기능을 정리해 봤는데 간단하게 요약해 보자면 텍스트를 써서 8번의 Generate를 누르면 우측의 그림이 생성되는 구조다 기능이 꽤 많지만 한번 슥 보
flatsun.tistory.com
'잡담 > WebUI(stable-diffusion)' 카테고리의 다른 글
| WebUI 저해상도 이미지의 화질 및 퀄리티 올리는 방법 (1) | 2023.02.28 |
|---|---|
| WebUI LORA(특정 그림체, 인물) 사용방법 정리 (2) | 2023.02.28 |
| WebUI img2img 사용방법(이미지 기반 생성) (1) | 2023.02.28 |
| WebUI 사진 이상하게 나올 경우 해결방법(저해상도, 박살남) (0) | 2023.02.28 |
| WebUI 특정 부분만 다시 그리는 방법 (0) | 2023.02.27 |
댓글